Splurge!

by Lila on January 25, 2011

When I was a little girl my mom had a pair of knee high boots. They were tall, supple leather, with metal grommets that my little fingers loved to fumble with. When my feet were still tiny little things, I loved to clomp around in them. For a short time, they actually fit, and I wore them around, but never wanted the attention I would get for wearing them to school. Now, I long for those boots to fit, there is something magical about the things you grow up with, the shoes that were too big, the passed down college sweatshirts, the plaid button-up work shirts. Needless to say I have been on my own hunt for a pair of knee-high boots that are reminiscent of my mother’s. Recently I found some dreamy boots at Free People that I mentioned in this post. After agonizing over it for quite awhile, I made the leap and purchased not one, but two pairs. I am caught between excitement and terror at this point. Waiting impatiently for my boxes to arrive and checking my account to make sure this was not a completely unsound decision. One of them was 50% off… oh how I can justify just about anything…

{ 1 comment }

Dreaming of…

by Lila on January 24, 2011

photo by Dale Mead

… going here. How can you really resist a location called The Plunge. The citizens of Richmond decided to create this haven in 1926 and it has now been restored to its prewar glory. It has even managed to outdo itself, not only is it a welcoming 83 degrees, but it also has gone green by treating its water with saline and heating its water with solar power. I have not yet indulged, but it is a dream that I plan on making a reality in the very near future.

… the art above Carrie Bradshaw’s bed in the Sex in the City movie. I all of a sudden find myself watching a lot of Sex in the City. Mr. Smyth and I happened to buy the entire series when finding it on sale at Target for a mere $10 a season. I was trepidatious at first, unsure that I would buy into the feminine quality of the show (I have strong roots in tom-boydom) but have found it to be highly enjoyable. Now I find myself wanting to collect to create my own wall of art like that of the ever fashionable Carrie Bradshaw. My cuz has turned me on to an etsy shop that has peeked my fancy with her recent art purchases.

… getting back to the farmers market. It have been almost 5 weeks now. The holidays put a damper on what had become a very happy ritual Mr. Smyth and I developed. We will get back, I know we will…

… finding a unifying theme for our little apartment. I have done a lot of little projects around our home, most of which I quite enjoy. Now, looking at them all together I realize that they live a little in isolation. The living room is coming together nicely, but I would like to continue to find ways to unite the space. Gotta love a good ongoing project!

…using my new stencils. Ideas abound! Mr. Smyth gave me a fabulous book for Christmas by the fabulous Ed Roth. I can’t decide what to stencil first… furniture, fabric, clothing? The possibilities are endless. Thoughts?

photos: 1, 2, 3

{ 0 comments }

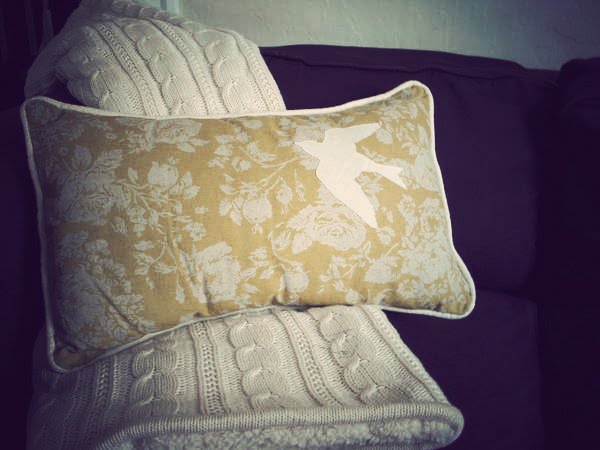
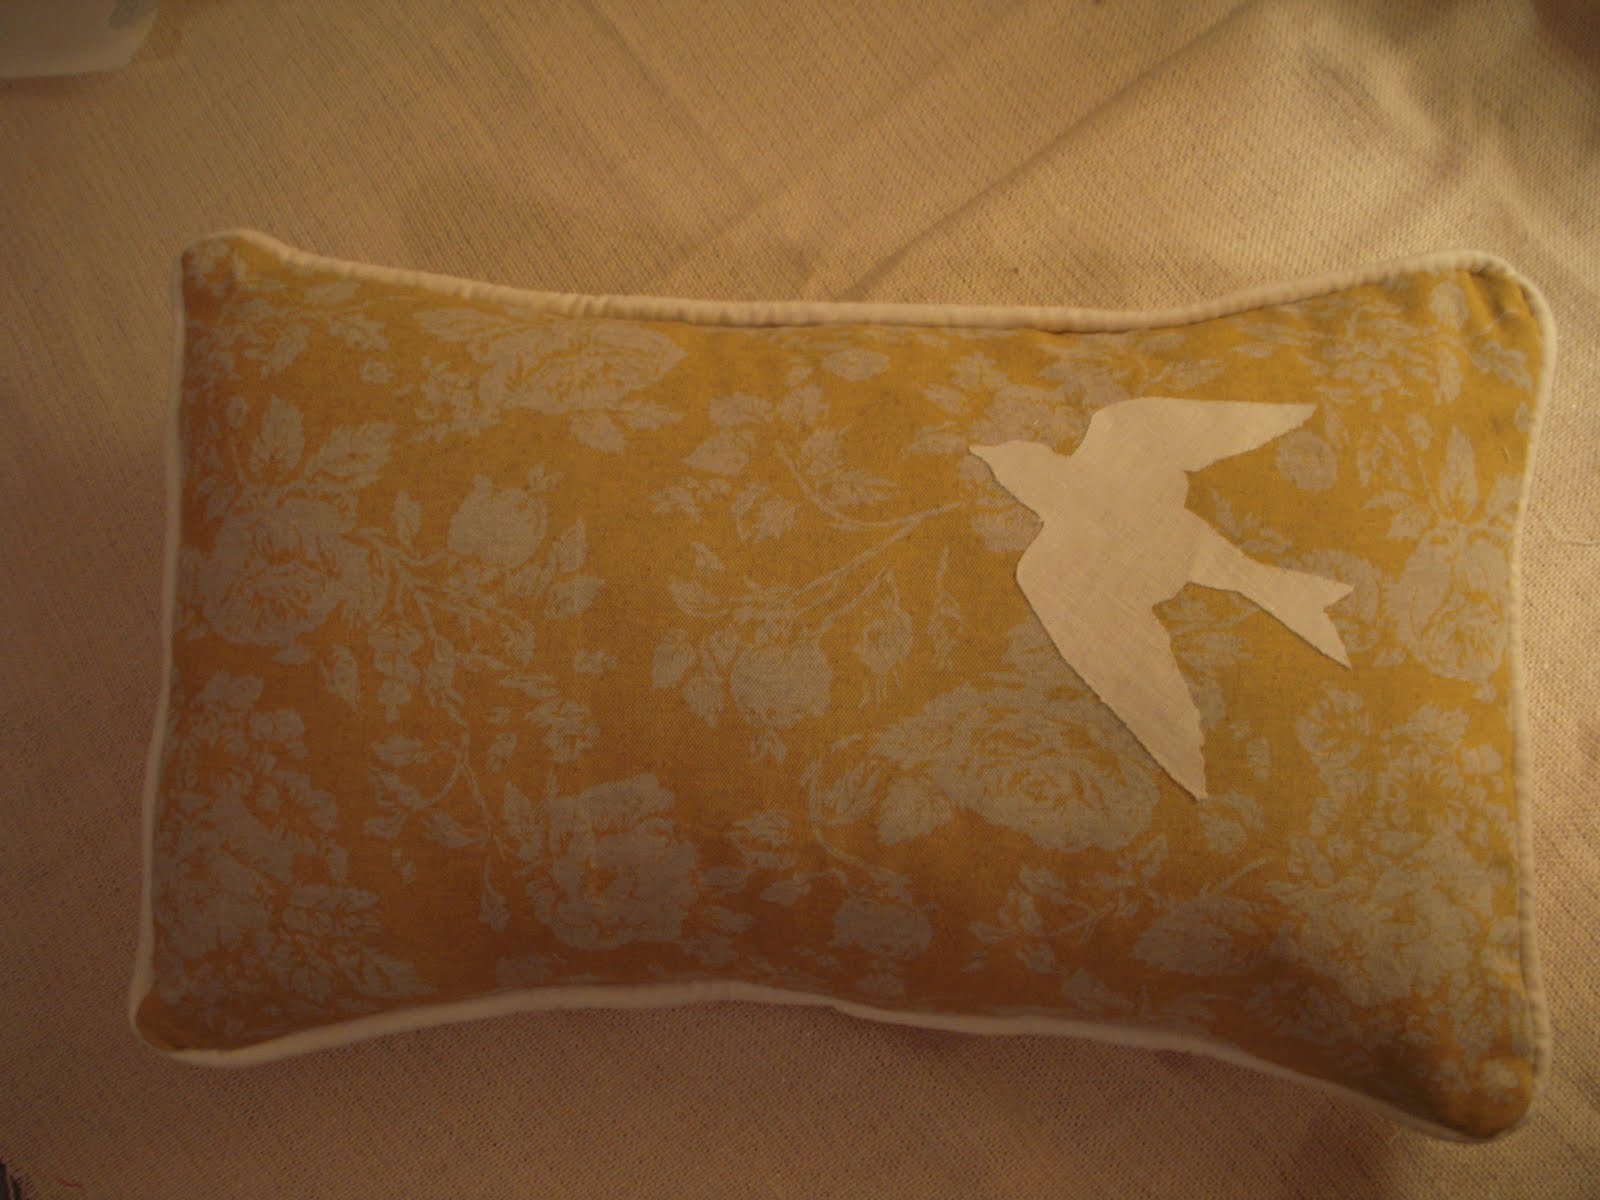
DIY: Bird Pillow

by Lila on January 22, 2011


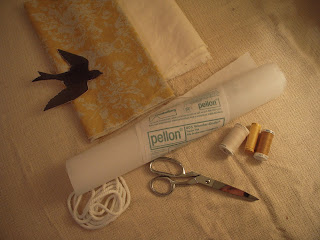
Materials:
– Background Fabric
– Silhouette Fabric (I also used this for the piping and the backing of the pillow to create a frame, if you decide to do the same be sure to buy the quantity you will need.)
– Wonder Under (paper-backed fusible webbing)
– Handmade stencil
– Cording to create Piping (optional)
– Thread
– Scissors
– Pencil
– Sewing Machine
– Iron (& ironing surface)

STEP 1: Create Your Stencil
Find an image you like and print it onto cardstock. I have a thing for birds, so I ran a google image search for bird silhouettes and found one that tickled my fancy. Be sure to print it at a size that is appropriate for your finished pillow. Cut out the image, and ta-da, insta-stencil.

STEP 2: Create Fusible Fabric
Cut out a square that will fit your stencil from both the Silhouette Fabric and the Wonder Under. Place the wrong side of the fabric (aka the side you do not want to show) and iron it to the fusible side of the Wonder Under.

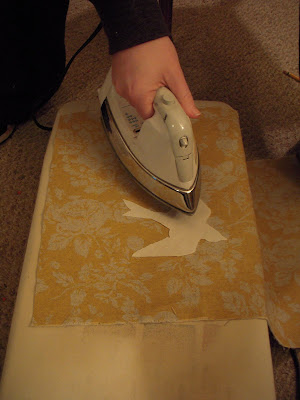
Your process might go a little something like this: 1) Place fabric down so that you are looking at the side you don’t want to show. 2) Place fusible side of paper onto fabric (this should result in the paper side of the Wonder Under facing you as the top layer). 3) Place iron on paper side of Wonder Under, moving over the entire area to fuse materials together.

STEP 3: Trace Your Stencil & Cut it Out
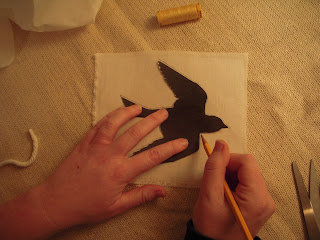
The beauty of Wonder Under is that you now have paper surface to trace your stencil onto. Place your stencil down, trace with a pencil, then cut out the image that you will iron onto your pillow. (The paper should remain on your fabric for this entire process.)


STEP 4: Iron On Your Image
Peel the paper from your silhouette. Place your image where you want it to end up on your finished pillow. Remember, when choosing a spot for your image, your background fabric will look a .025 – 0.5 inch smaller once you sew it together. Carefully move your pillow to your ironing surface and iron on your image with the right side facing up. The beauty of fusible webbing is that now your image is adhered to your background fabric. (NOTE: This would be a good time to do any embellishment like top-stitching or beading. I kept it simple this time, but I have a big ideas for the future.)

STEP 5: Create Piping (optional, you can skip to step 7 if you do not want piping on your pillow)
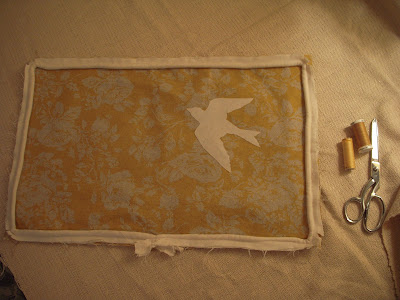
I used the white linen, which matched my bird, to create the piping and the backing of my pillow. This way it acted as a frame and highlighted the bird further. To create the piping you need to: 1) Measure the circumference of your pillow to figure out the length of the piping you will require. 2) Cut two-inch wide lengths of your piping fabric. 3) Sew the lengths of fabric together to create one long 2-inch wide piece of fabric. 4) Fold the linen in half around the cording and use a sewing machine to stitch the fabric together, staying as close to the cording as possible. In my case, this resulted in the foot of my sewing machine being raised and riding on top of the cording.

STEP 6: Pin and Snip Your Piping
Now, with the right side of the fabric face up, pin your piping around the edge of the pillow. The piping must face toward the center so that when you turn it right side out it will be on the outer edge. Start at the bottom center of your pillow. When you reach corner make three snips along the piping, careful not to cut the stitching, to allow the piping to traverse the corner. At the end, where the two pieces of piping meet, simply allow the piping to overlap (picture below in Step 7).

STEP 7: Baste the Piping to the Pillow
To assure that the piping remains where you want it as you sew your pillow together, it is important that you baste your piping to the front side of the pillow. Again, make sure that the right side of the fabric is facing up, that the piping is facing the inside of the pillow, that you have made small snips at the corners, and that the piping overlap is as inconspicuous as possible. Remember to remove your straight pins once you have basted your piping.
STEP 8: Sew the Front and the Back Together
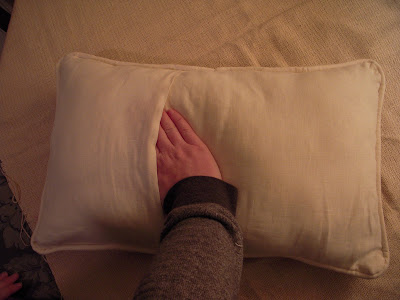
To create a pillow that has an opening at the back you will want to cut out two panels of your packing fabric that overlap by about 2-3 inches. Run these two panels through your sewing machine to create a hem on the edges that will overlap (see photo below). Now, place the right sides of the fabric together. The back panels should be overlapping so that the outside edges match up with the size of the front of your pillow. Pin the fabric in place and sew. You can use the basting stitches as a guideline and sew directly over them.
STEP 9: Turn Right Side Out & Put in Pillow Insert
Once you have sewn your pillow together it is time to turn it right side out. You may want to use a straight pin to pull out the corners where the piping doesn’t want to reveal itself. Then, gently push your pillow insert into the back of your pillow cover. And there you have it, a beautiful pillow to brighten up your home.
I am a bit of a self-taught sewer. Most of my projects start with an idea and then I stumble through the process of trying to figure out how to make that idea come to life. This is the first DIY I have written, so I hope that it is clear and helpful. If you have any questions leave them in the comments and I will do my best to get back to you. I would also love to see photos if anyone attempts to make their own pillow!

Have a great weekend, happy sewing!

{ 0 comments }

The power of knobs…

by Lila on January 15, 2011

The clutter fest is over. My initial hope for our television’s home was to have an industrial beauty. After looking around craigslist and quite a few junk shops, I came to the realization that this is quite a specialized piece. So I headed where anybody looking for a reasonably priced piece a furniture would go, IKEA. They did not have a vintage, industrial piece (shocker) however, they did have a clean white, three drawer unit. Pros include: a lot of hidden storage, convenient space for electronics that require remotes, and a size that fills the space below the window beautifully.


In an attempt to incorporate this piece into the concept of my room I decided to splurge on some yellow knobs from Anthropologie. Ah, the power of cute knobs… The knobs play on the yellow of the fabric covering the chair, as well as adding a little French Country flare to the clean lines of the television stand.

The biggest, best thing about this addition: the elimination of clutter! Happy day!

{ 0 comments }

Color Me Yellow

by Lila on January 14, 2011


Is there ever really enough yellow in the world? Here is the chair that inspired it all. The fact that I now own this chair is a little bit of a miracle in my eyes. The universe came together in a beautiful way: our dear friends gifted their old chair to us a couple months ago, the lovely Jo-Ann put my dreamy fabric on sale, and my fabulous mother-in-law informed me that she was going to have my chair reupholstered as my Christmas gift. I had been drooling over the fabric for months and then, all of sudden, it was 50% off. Happy day. I have to say that I was blown away. The color is a favorite of mine and the way the very skilled peeps lined-up the pattern is impressive and sets off the fabric. You will see that the arrival of this chair greatly influenced the choices I have made in the rest of the room. What a fantastic first step toward my dream living room.

p.s. I am so sad I do not have a before picture! The picture in your mind should be of a orange, shag fabric. It was also pretty cute, but much more dated and clearly a favorite of cats, as seen in the wear and tear to the poor thing. In the future I promise more before photos!

{ 0 comments }

Phase 2: Next Steps (Living Room)

by Lila on January 12, 2011


So I finished up my inspiration board not too long ago. Since then I have been looking at what I own and my budget to think about how I can move in that direction. So far so good…

Step 1: Recover a favorite chair in this fabric. Bright sides = chair was given to us by dear friends who moved down south, fabric was 50% off over the holidays, my delightful mother-in-law took it to be reupholstered as my Christmas present this year!

Step 2: Paint our current bookshelves Squirrel by Behr. It is a warm gray color meant to give the shelves a more industrial feel given that we cannot currently afford new bookshelves. Bright sides = paint might be high on labor, but it is low on cost.

Step 3: Reorganize the shelves to make them more appealing. Right now my bookshelves are a little cluttered and jammed with books! To better this situation, I plan to box up books from my childhood to create some room for photos. I would also like to reorganize the remaining books by color (inspiration see in previous post).

Step 4: Purchase a new television stand. Our current table is not working for me… too cluttered, too small… We’ll see what happens…

Step 5: Pillow remix. This is a little sad/silly/excessive because I just recovered my pillows, but I did not end up super happy with them. I learned a lot though! Experimentation will occur as I attempt to use a couple new techniques, I’ll tell you now it goes. I am using the pillows seen in the inspiration board as my muses. At least one must be owl themed!

I have already begun on some of these projects and cannot wait to show you the before and after shots!

photo: 1

{ 0 comments }

Inspired by…

by Lila on January 7, 2011

I love this photo by chodta. Her bookshelves are beautiful and add to the decor of the room. Organizing the books by color turns them into artwork. I am adding this idea to the next phase of creating my dream living room. As I looked more into this inspiration I found an article on a bookstore in San Francisco who had a local artist, Chris Cobb, organize their entire inventory by color… amazing!

photo taken by Chris Cobb

photos: 1, 2

{ 0 comments }

Dreaming of…

by Lila on January 4, 2011


… romance
… painting my bookshelves (watch out, next steps towards dream living room coming your way soon!)
… beginning meatless Mondays, a movement I read about recently. Thought I would try it to expand my vegetarian repertoire, maybe increase the health of my diet, and help the earth.
… some cute biking gloves. I’ve been really good about biking to work, but my hands are freezing! Any recommendations out there?
… starting a 30 for 30 as described by Kendi on her fabulous blog. Thanks to my wonderful and fashion forward cousin Kate for helping me get started by looking in my closet. She even blogged about it here. So far I have actually worn five of the eight outfits she shows, they were huge holiday hits.
… time… have I mentioned that before… just more time…

Phew… it was a busy holiday season. Which makes me think of how I can’t wait to have a baby! For two reasons, first and most important is that I am totally excited to be a mom. Being a teacher I get the pleasure of being around a million different personalities everyday. I get to watch them grow into their individuality. There is a big part of me that can’t wait to help shape the world of my own little one (not to mention that I can’t wait to see Mr. Smyth as a papa, he is going to be wonderful). The second reason is that I will have valid excuse to channel some of the holiday traffic toward our home. I like hosting and would be happy to have a revolving door, but having to get to so many different places ourselves is a little exhausting. Any-who, happy new year everybody!

picture: 1

{ 0 comments }

Dreaming of…

by Lila on December 23, 2010

… a long drive, filled with Christmas music and chai tea lattes.
… more than one pair of jeans that fit!
… the smiles that will fill the room Christmas morning when everyone opens their beautiful bundles, I love getting people gifts, giving a good gift and watching a person’s reaction is one of my favorite things…
… setting a table for a birthday dinner with the vintage plates Mr. Smyth got me for Christmas
… making a snow angle and then drinking hot chocolate to warm back up while I admire my work

I love the holiday season. It is a time when I feel surrounded by dreams coming true instead of thinking about things that haven’t happened yet.

Today was my personal Christmas morning with Mr. Smyth and it was delightful. He is so thoughtful and found some things that I love, thank you babe. More than that, I love having a whole morning with him and cinnamon rolls, did I already use the word delightful…

photo: 1

{ 0 comments }

Phase 1: The Dream (Bedroom)

by Lila on December 20, 2010


So hopefully you have heard about my plan. I have all kinds of projects lined up to start working toward my dream living room and was eager to get started when I realized that the rain filled days are not the best for big projects that require outdoor space. I will be updating you soon on the next steps towards that project. In the mean time I started collecting ideas for the bedroom. This is very appropriate given that I usually plan out at least twenty projects before finishing one. So here it is…

Phase 1: The Dream
You can see that my tendency toward the romantic, French country look carries over in my plans for the bedroom. I love the little details in the room, starting with the irresistible guppy ring dish *swoon* and continuing to the vintage dresser top items. I have already started storing my make-up brushes in the apothecary jar shown above and am really happy with the combined practicality and old-school vibe it has going. In terms of linens, I really like clean white, with accents of color seen in throw pillows and quilts. More than anything I want to wake up in a space that feel light, organized, and cozy!

The items I am currently drooling over (shown above) include:
1. Gulping Guppy Ring Dish from Anthropologie: $18.00
2. Metal Accordion Side Table from Urban Outfitters: $60.00
3. St. James Framed Panel Bed from Restoration Hardware: $1990.00
4. Roving Rays Lamp from Anthropologie: $498.00
5. Wedding quilt from my mother-in-law: Priceless
6. French Carved Armoire from Armoire Showroom: $937.50
7. Antique Shaving Mirror from NouveauBella (Etsy): $39.99
8. Apothecary Jar from my stash
9. Vintage Mint Green Travel Case from LaBrocanterie (Etsy): $33.00
10. Vintage Painted Cottage Chic Nine Drawer French Provincial Tea Stained Dresser from The Painted Cottage (Etsy): $325.00

Total for my current dream bedroom: $4459.49
(factoring in 2 side tables and 2 lamps)

So now for the hard/fun part. Finding cost effective ways (with a couple splurges and my crafty skills) to accomplish a similar look within my budget.

Related Posts Plugin for WordPress, Blogger...

{ 0 comments }